By Karen StabinerFeatures correspondent
 Anne Fishbein
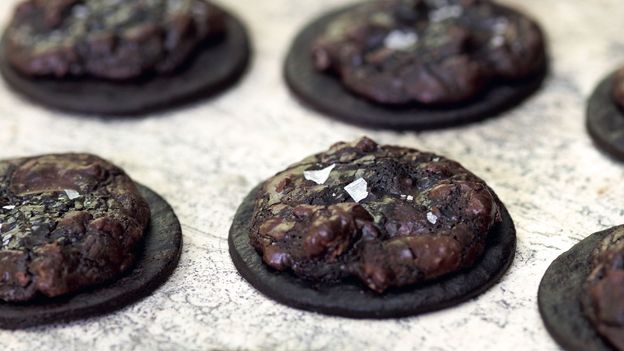
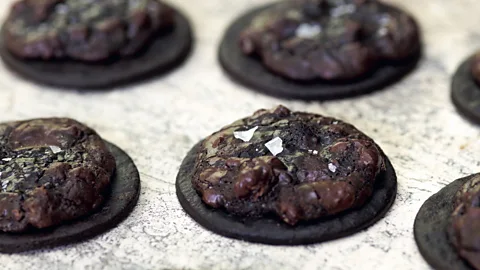
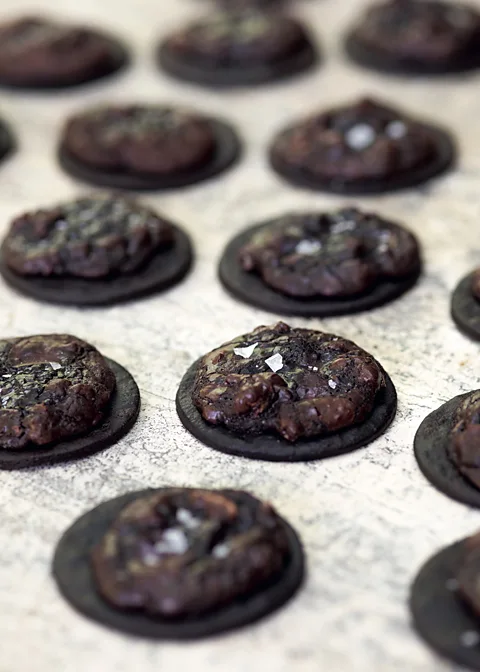
In her new cookbook, The Cookie that Changed My Life, Nancy Silverton takes the classic Oreo to a new level with her recipe for the ultimate chocolate cookie.
If you’re going to call a recipe “The Ultimate Chocolate Cookie”, you better be prepared to back up the claim.
Nancy Silverton is. The only chef to have won James Beard awards both for outstanding pastry chef (1991) and outstanding chef (2014), Silverton has always aimed high, and her new cookbook published this November, The Cookie That Changed My Life, is no exception.
Silverton has spent over 40 years in restaurant kitchens – including Los Angeles’ legendary La Brea Bakery and a global network of restaurants that began with three Italian places on a Los Angeles corner affectionately known as the Mozzaplex. Somehow, she has also found time to write eleven cookbooks, and her latest one takes her back to her baking roots with what she considers to be definitive recipes for over 100 dessert classics.
[jump to recipe]
Included in that is the ultimate chocolate cookie, her homage to the world’s most popular cookie, the Oreo, 40bn of which are sold annually in about 100 countries. Since it was introduced in 1912 by New Jersey’s National Biscuit Company, known today as Nabisco, the little chocolate sandwich cookie filled with vanilla crème has grown in terms of taste as well as reach, with new flavours designed to appeal to customers’ palates in large markets like China and Mexico, as well as to US consumers looking for a new spin on an old favourite.
The Oreo began life as runner-up to the more popular and established Hydrox cookie, when two competing brothers fought for cookie supremacy. Eventually Oreo toppled its older and more established competition, as aggressive marketing and pricing made the Oreo the cookie Americans loved best. Over the years, it has become a culinary icon; the simple question of how best to eat one (dunked, broken apart, filling first) has spawned an ongoing, worldwide customer debate.
If readers of Silverton’s new book think their palates are too sophisticated for a packaged grocery-store cookie, she’s prepared to take them to task. “If you love chocolate, you love Oreos,” she said. “You’re lying if you say you don’t.”
Silverton’s first version of the Oreo – a retooled cookie with a white fondant-type filling, which she called the “Almost Oreo” – appeared in The Nancy Silverton Sandwich Book in 2005, after what she recalls as “at least two dozen tries”, but that hardly meant she was done with it. In 2021, like so many restaurateurs facing the pandemic shutdown, Silverton found herself with evenings free and in need of a project. So, she started to develop her own versions of familiar desserts she loved – including reworking her 16-year-old Oreo cookie recipe.
To qualify as ultimate, the new version needed more complex flavours and texture. To achieve this, the cookie, which serves as the base layer for this open-faced edition, calls for nonalkalised, or “black” cocoa, and cocoa nibs, both of which add a tart, acidic note that counteracts the essential sweetness of the original. Silverton also replaces the original crème with a fudgy top layer, made with bitter chocolate, cocoa and toasted walnuts for crunch. She spreads the topping over the pre-baked cookie, puts it back in the oven for a brief second bake, and ends up with the familiar snap of an Oreo, complemented by a deep chocolate spread. There’s a lot going on.
The recipe is almost four pages long, but Silverton has a ready answer for readers who might find it daunting, because she’s been fielding such comments forever. Long does not equal difficult, she said, quite the opposite. Silverton includes lots of specific tips – baking paper for chilling and rolling the dough; the preferred size and shape for the cookie cutter; the best way to avoid over toasting the walnuts – not to frazzle the reader but to guarantee good results.
“When I try to make the recipes shorter, so they look like they’re easier, I don’t feel like I’m setting up the baker for success,” said Silverton. “These are recipes anybody can do – there’s little technique in here, the recipes aren’t difficult, most of them, and not time-consuming. But you have to follow procedures.”

 Anne Fishbein
Silverton admits that she is driven, in part, by a desire to prove her mastery, even if she is the only one who seems to need further evidence of it. The new cookbook was inspired by her domestic partner’s favourite peanut butter cookie, “one that was way better than any peanut butter cookie I’d ever done”, said Silverton. That exemplary peanut butter cookie was from a fellow Los Angeles baker, Roxanna Jullapat, head baker and co-owner of Los Angeles’ Friends & Family bakery. Silverton took it as a challenge.
Silverton’s work ethic is part of her legacy to younger bakers who see her as a role model, even if they’ve never met her. Silverton started her legendary career in the 1970’s, at a time when the only kitchen jobs women could get were in the pastry kitchen, and the momentum required to keep moving forward fuels her to this day.
She is surrounded by the next generation in her restaurant kitchens and hopes to inspire her younger colleagues by example. “I haven’t finished my story yet,” said Silverton, who occasionally drafts her two grandchildren to be taste testers. “Working with the next generation is one of the things that incentivises me,” she said.
This could turn out to be the penultimate chocolate cookie because everything Silverton does is a work in progress. “This is my ultimate chocolate cookie for today,” Silverton said, “and then in 10 years I’ll say I thought I’d perfected everything – but I hadn’t.”
 Anne Fishbein
The Ultimate Chocolate Cookie recipe
By Nancy Silverton
Makes about 24 cookies
You will need a 6cm (2½in) round cookie cutter, preferably fluted, for these cookies.
Ingredients
For the fudgy topping:
75g (¾ cup) walnut halves
180g (1½ cups) powdered sugar (icing sugar)
51g (½ cup) natural cocoa powder
½ tsp kosher salt, preferably Diamond Crystal
1 extra-large egg
1 extra-large egg white
57g (2oz) bittersweet chocolate (70% cacao), coarsely chopped (scant ½ cup); halved if you’re using feves
8g (1 tbsp) cocoa nibs
For the cookie bottoms:
85g (3oz) bittersweet chocolate (70% cacao), coarsely chopped (about ¾ cup); halved if you’re using feves
16g (2 tbsp) cocoa nibs
84g (6 tbsp) cold unsalted butter, cubed
69g (¼ cup plus 1½ tbsp) granulated sugar
69g (¼ cup plus 1½ tbsp) packed dark brown sugar
16g (about 2½ tbsp) black (nonalkalised) cocoa powder
½ tsp baking soda
½ tsp kosher salt, preferably Diamond Crystal
1 tbsp pure vanilla bean paste or vanilla extract
122.5g (¾ cup plus 2 tbsp) unbleached all-purpose flour
flaky sea salt
Step 1
To make the fudgy topping, adjust an oven rack to the centre position and preheat the oven to 160C/325F.
Step 2
Spread the walnuts on a baking sheet and place them on the centre rack of the oven to toast until they’re lightly browned and fragrant, 8 to 10 minutes, shaking the baking sheet and rotating it front to back halfway through the toasting time so the walnuts brown evenly. Remove the walnuts from the oven and set them aside until they’re cool enough to touch. (If you think the nuts are on the verge of being overtoasted, transfer them to a plate so they don’t continue to cook from the residual heat of the pan.) Coarsely chop the walnuts. Turn off the oven.
Step 3
Sift the powdered sugar (icing sugar) and cocoa powder into the bowl of a stand mixer, put the bowl on the stand, and fit it with the paddle. Add the salt and mix on low speed for a few seconds to distribute it. Add the whole egg and egg white and mix on low speed until combined, stopping to scrape down the sides and bottom of the bowl with a rubber spatula as needed. Add the chocolate, cocoa nibs and walnuts and mix on low speed for about 30 seconds to distribute the additions. Take the bowl and paddle off the stand and scrape them down with the spatula, scraping from the bottom up to release any ingredients from the bottom of the bowl. Cover the bowl with cling film and refrigerate until the topping is chilled, at least 1 hour.
Step 4
To make the cookie bottoms, fill a small saucepan with about 4cm (1½ to 2in) of water and set a small stainless-steel bowl atop the saucepan to make a double boiler, making sure the water doesn’t touch the bottom of the bowl. Bring the water to a simmer over medium heat. Put the chocolate in the bowl and melt it, stirring and scraping the bowl with a silicone spatula to prevent the chocolate from burning. Turn off the heat and take the bowl off the double boiler.
Step 5
Put the cocoa nibs in a spice grinder or a mini food processor and pulse to chop them to the size of grains of rice. Transfer the nibs to a small bowl.
Step 6
Put the butter in a stand mixer fitted with the paddle and beat on medium speed until the butter is soft but still cold, 3 to 4 minutes, stopping to scrape down the sides and bottom of the bowl and the paddle with a rubber spatula whenever butter is accumulating. Add the granulated sugar, brown sugar and cocoa powder and beat on medium speed until the mixture is light and fluffy, 3 to 4 minutes, scraping down the bowl as needed. Add the baking soda and salt and beat on medium speed for about 15 seconds to incorporate them. Stop the mixer, add the melted chocolate and vanilla and mix on medium-low speed for about 30 seconds to combine. Stop the mixer and scrape down the bowl. Add the flour and cocoa nibs and mix on low speed for about 30 seconds until no flour is visible. Remove the bowl and paddle from the stand, and scrape them down with the spatula, scraping from the bottom up to release any ingredients from the bottom of the bowl.
Step 7
Lay a large sheet of baking paper on a work surface. Divide the dough in half. Form one portion of the dough into a disk and place it in the centre of the paper. Lay another sheet of baking paper on top of the dough, lining it up with the bottom sheet. Applying firm steady pressure with the rolling pin, roll the dough between the paper to ⅓cm (⅛in) thick. Place the paper-sandwiched dough on a baking sheet and place it in the refrigerator. Repeat, rolling out the second half of the dough in the same way, between two fresh sheets of baking paper. Add it to the baking sheet in the refrigerator, laying it on top of the first sheet of dough. Chill the dough until it is firm, at least 1 hour.
Step 8
Remove one sheet of dough from the refrigerator and lay it on your work surface. Peel the top sheet of paper off the dough and lay it back down on the dough. (This loosens the paper so after you cut the cookie rounds, you will be able to lift them easily off the paper without them sticking.) Flip the sheet of dough over. Peel off the top sheet of baking paper and lay it clean-side up on a large baking sheet to line it.
Step 9
Using the round cutter, cut rounds from the dough, cutting them as close together as possible to get as many as you can from one sheet of dough. (If the dough is so stiff that it cracks when you cut the cookies, lay the baking paper back on the dough, let it rest for about 5 minutes, running the palms of your hands over the dough during that time to soften it slightly; remove the paper and resume cutting the cookies.) Use a thin metal spatula to lift the dough rounds and place them on the prepared baking sheet, leaving at least 1¼cm (½in) between them. Gather the scraps and set aside. Use the bottom sheet of baking paper to line a second baking sheet.
Step 10
Remove the second sheet of dough from the refrigerator and repeat, peeling off the baking paper, cutting the cookie rounds, and placing the rounds on the prepared baking sheet, leaving at least 1¼cm (½in) between them. Gather all the scraps and form them into a 2½cm (1in) thick disk, refrigerate until the dough is firm, then roll out between two sheets of paper. (You can reuse sheets that were removed from the dough, with the clean sides facing out.) Cut the scraps into rounds and add them to the baking sheets. Wrap the dough in cling film and refrigerate until it is chilled and firm, at least 30 minutes.
Step 11
Adjust the oven racks so one is in the top third and the other is in the bottom third of the oven and preheat the oven to 150C/300F.
Step 12
Remove the baking sheets from the refrigerator and remove and discard the cling wrap. Place one baking sheet on each oven rack and bake the cookies until they are firm around the edges, about 25 minutes, switching racks and rotating the baking sheets front to back halfway through the baking time so the cookies bake evenly. Remove the cookies from the oven and set aside to cool to room temperature. Increase the oven temperature to 175C/350F.
Step 13
Remove the fudgy cookie topping from the refrigerator. Using 2 tablespoons, one to scoop the fudgy topping and one to scrape if off the spoon, spoon about 16g (1 tbsp) of the fudgy topping onto the centre of each cookie bottom, leaving the edges of the bottoms visible. Sprinkle each cookie with flaky salt.
Step 14
Place one baking sheet on each oven rack and bake the cookies until the fudge is set around the edges and beginning to crackle on top, 10 to 12 minutes, switching racks and rotating the baking sheets front to back halfway through the baking time. Remove the cookies from the oven and let cool to room temperature. The cookies can be stored at room temperature for 2 to 3 days.
Reprinted From The Cookie That Changed My Life by Nancy Silverton with Carolynn Carreño © 2023 by Nancy Silverton. Excerpted by permission of Alfred A. Knopf, a division of Penguin Random House LLC. All rights reserved. No part of this excerpt may be reproduced or reprinted without permission in writing from the publisher.
—
Join more than three million BBC Travel fans by liking us on Facebook, or follow us on Twitter and Instagram.
If you liked this story, sign up for The Essential List newsletter – a handpicked selection of features, videos and can’t-miss news delivered to your inbox every Friday.
#cookie #perfected
